THE PHOTOSHOP WORKSPACE
When you first open Photoshop, the workspace consists of a set of default or standard menus, panels, and tools. Photoshop's menus appear at the top of your screen, the Applications bar is below the menus, the Tool Options bar below that, the panels are placed on the right side of your screen (but can be moved), and the tools are located in a toolbox on the left (which can also be moved).
1- Application bar: The application bar provides access to the Bridge, navigation functions, and window viewing controls. Under Windows, the application bar is located to the right of the menu bar.You can customize the layout and functionality of the Photoshop workspace by using the workspace switcher.The default workspace is called Essentials ,
There are presets designed for more specialized work called Design, Painting, Photography, 3D, and Motion. You can modify these presets and save them, reset a preset that you've customized, or even create your own custom presets. The Essentials, Design, and Painting presets are always visible on the Application bar. To access the other presets, click on the button at the top right to display the menu.
2- Menu bar: Click a name in the menu bar to display a list of commands. Click a command in order to choose it. A command followed by three dots (such as New…) displays a window of options called a dialog box. Otherwise, the command works right away.
- File
- The menu contains options to create new images, load existing images, save images, acquire images from scanners, print images, automate functions, set colour settings and exit the program.
- Edit
- The menu contains options to copy, cut, and paste entire images or parts of images, fill areas of an image, create strokes or outlines around image elements, transform or modify images and set preferences.
- Image
- The menu contains options to modify colour depth or mode, manipulate or adjust colour and other image properties, modify image size, canvas size and orientation, examine colour information and extract areas of an image from backgrounds.
- Layer
- This menu contains options to modify and manipulate layers. (Layers are covered in depth later.) To summarize, a Photoshop image can contain a number of separate levels, or layers, that contain image information.
- Select
- The menu contains options to create, modify and manipulate Photoshop's selections. Selections are areas of an image that you choose to isolate from the rest of the image. For example, you might want to isolate a person's eyes to change the colour without affecting the rest of the image.
- Filter
- Filters, or special effects, are contained in this menu. Applying a filter to an image will modify the image based on the filter's predefined instructions. Examples of some filter effects: blurring, sharpening, distorting, and applying brush strokes or textures to an image.
- Analysis
- This menu provides options for measuring, counting objects, and placing markers in your image document.
- 3D (Photoshop Extended version only)
- This menu contains tools for creating and manipulating 3D objects but won't be covered in this course.
- View
- The menu contains options to change your view of an image; e.g., zooming in and out or displaying how the image might look when printed or viewed on another computer. This menu also houses the ability to show/hide rulers and guides, which will aid in editing your images.
- Window
- contains options to show/hide the Toolbox and panels, as well as options to organize images within Photoshop's workspace.
- Help
- Online help, information about plug-ins and information about the version of Photoshop you're using are located in this menu. Use Help Topics for reference or to find out how to accomplish objectives you might be having problems with.
3- Options bar: The settings here modify the behavior of the active tool. The options bar is context sensitive, so you see a different set of options each time you switch to a different tool. If the options bar somehow disappears,you can restore it by pressing the Enter or Return key.
4- Cursor: The cursor (sometimes called the pointer) is your mouse’s on-screen representative. It moves as your mouse moves and changes to reflect the active tool or operation.Keep an eye on it and you’ll have a better sense of where you are and what you’re doing.
 5- Panels: A panel (formerly called a palette) is a window of options that remains visible regardless of what you’re doing. To switch between panels in a side-by-side group, click a named tab. You can move a panel out of a group by dragging its tab.
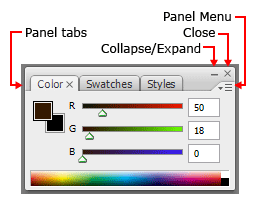
 Many of the panels are grouped together in panel groups because their functions are related. When this is the case, the titles of the individual panels will appear as tabs under the title bar, as shown in this example. The Color panel is currently active. The tabs of the Swatches and Styles panels are a darker grey. To bring a panel to the front of a group so you can access its options, click on its tab.
Note: If you've noticed that the panel shown here looks a bit different from what you're seeing in Photoshop, here's why. This is an example of a floating panel (not joined to a dock) which has a title bar. (That's actually a misnomer because there's no title in it but that's what Adobe calls it.) When a panel is part of a dock, the title bar disappears, along with the panel's button and the Collapse/Expand control. We'll delve into terms like 'floating' and 'docks' in the next lecture.
Many of the panels are grouped together in panel groups because their functions are related. When this is the case, the titles of the individual panels will appear as tabs under the title bar, as shown in this example. The Color panel is currently active. The tabs of the Swatches and Styles panels are a darker grey. To bring a panel to the front of a group so you can access its options, click on its tab.
Note: If you've noticed that the panel shown here looks a bit different from what you're seeing in Photoshop, here's why. This is an example of a floating panel (not joined to a dock) which has a title bar. (That's actually a misnomer because there's no title in it but that's what Adobe calls it.) When a panel is part of a dock, the title bar disappears, along with the panel's button and the Collapse/Expand control. We'll delve into terms like 'floating' and 'docks' in the next lecture.
Panel Menus : Each panel or panel group has a panel menu button. In a panel group, the menu options apply to the active panel. The example shown here is the Paragraph panel menu. The top portion lists commands that are specific to paragraphs. The two commands at the bottom are displayed for all panels and panel groups.
Each panel has generic menu you can access by right-clicking (Ctrl clicking) on its tab. The and commands also appear in the panel menu above. The remaining options will be explained in the next lecture.
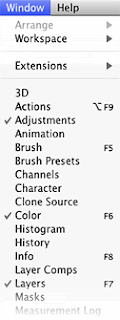
Open and Close Panels :All the panels are listed in the menu. The panels preceded by a check markare currently displayed and active in the workspace. Some unchecked panels may be displayed but are inactive; i.e., the panels with darker tabs in panel groups. The menu shown here is telling us that the Adjustments, Colour, and Layers panels are currently active in the workspace.
When you select an unchecked panel name from the menu one of two things will happen:
- The panel will open if it wasn't already visible in the workspace.
- If the panel was behind an active panel in a panel group, it will become the active panel.
The menu can also be used to close panels. Selecting a checked panel name will close that panel and, if it was part of a panel group, will close the entire panel group.
Here are three other options for closing panels:
- Click on the panel's button. (Only floating panels have them.)
- Open the panel menu and choose or for a panel group.
- Right-click (Ctrl-click) on the panel tab and choose or from the pop-up menu.
Show or Hide All Panels
To toggle between hiding and showing all open panels, including the Toolbox and Tool Options bar, press the Tab key. If you have enabled Auto-Show Hidden Panels in the Interface preferences, when you hover over a hidden panel's location on the screen, it will temporarily appear. On a Mac, you can only unhide the dock and the Toolbox. Do this by moving your cursor to the left edge of the screen (for the Toolbox) or the right edge (for the dock). The panels will come into view, letting you access them. Once you move the cursor away from the panels, they will hide again.
Collapse and Expand Panels

Panels and panel groups can be collapsed so that only their panel names and icons are displayed, as shown here. Do this by clicking on the
collapse/expand control(double arrows circled in red) on the title bar. To restore the panel to its full size, click the same control again. Alternately, you can double-click on the title bar to accomplish the same thing.
Resize a Panel
To resize a panel:
- Windows: Click and drag on any side or the bottom right corner when the resize arrow appears.
- Mac: Click and drag on any side when the resize arrow appears or drag the resize corner (shown at bottom right).
Not all panels can be resized, however. The Toolbox is an example of this, although it can be made into a single or double column by clicking the collapse/expand control. The Colour panel is another example.
Minimize or Maximize a Panel
Panels and panel groups can be
minimized so just the title bar and tabs are showing. There are three ways to do this:
- Double-click on the panel's tab.
- Double-click in the space between the tabs and the panel menu.
- Right-click (Ctrl-click) on the panel's tab and choose from the pop-up menu.
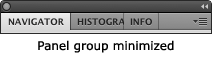
Here is the same panel minimized. Single-clicking on a tab or double-clicking to the right of the tabs will
maximize the panels. You can also
right-click (
Ctrl-click) on the panel's tab and choose from the pop-up menu.
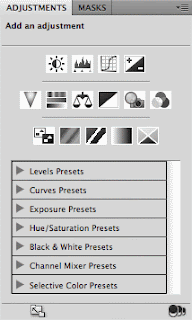
The Adjustments Panel
Options for applying colour and tonal adjustments to images are found in the Adjustments panel, displayed as icons in the top half of the panel. These adjustments are placed on a separate adjustment layer so that the image you are working on isn't altered. The bottom of the panel contains preset adjustment settings. You can even create your own preset adjustments and store them.
The Channels Panel
The built-in colour channels are displayed in the Channels panel. It is also used to
save and modify selections made in a Photoshop document as well as to
define areas of transparency in an image that will be opened in other applications, such as those used for digital video or 3D.
The Colour Panel
The Colour panel is used to
create colours. The swatch at the top left (black) is the current foreground colour and the swatch beneath it (white) is the current background colour (just like in the Toolbox).
The History Panel
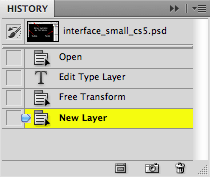
The History panel keeps a record of all the changes you make to your image as you're editing. If you're not satisfied with a change or a series of changes, you can use the History panel to
restore your image as it was before the changes. You can always undo your last action with
Ctrl-Z (
Cmd-Z), as with other programs, but the History panel gives you far more versatility and control.
The Layers Panel
The Layers panel is used to
create, manipulate and modify layers. Layers can be anything that Photoshop can create or import, separated from other elements (or layers) in an image.
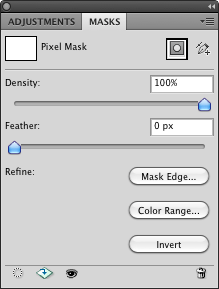
The Masks Panel
The Masks panel lets you
add vector or pixel masks to your image and to make adjustments to the masks.
The Mini Bridge Panel
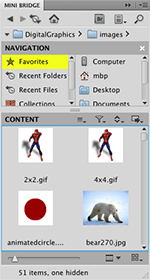 This is a scaled-down version of the Adobe Bridge application that is used to locate, open, and organize images.
The Paths Panel
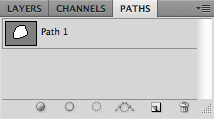
The Paths panel is used to
create, manipulate, and modify pathswhich are covered in detail in later sections.
The Styles Panel
The Styles panel maintains a library of effects or textures that can be applied to a layer or shape simply by clicking on a style.
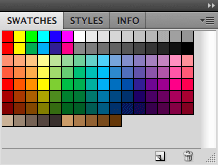
The Swatches Panel
The Swatches panel contains a number of pre-selected colours to choose from. You can create your own swatches as well as load other colour sets. Photoshop includes a colour set of Web-safe swatches, which is a collection of colours that are supported across browsers.
Panel Basics Summary
- Panels are a collection of commonly used options and functions.
- Most panels are arranged in groups.
- Panels can be open or closed, hidden or displayed, collapsed or expanded, minimized or maximized, and some can be resized.
- The Tool Options bar is context-sensitive, meaning that the options it displays will depend on the tool you have selected. It is used to set tool options.
- Scrubby sliders allow you to quickly change values for many options without moving a slider bar or typing a number.
- The Adjustments panel lets you apply colour and tonal adjustments to an image.
- Channels are used to save and modify selections made in a Photoshop document as well as to determine areas of transparency.
- The Colour panel is used to create new colours.
- The History panel records all the changes you make to your image as you're editing.
- The Layers panel is used to create, manipulate and modify image layers.
- The Masks panel lets you add and adjust masks.
- The Mini Bridge panel is used to locate, open and organize files.
- The Paths panel lets you create, manipulate, and modify paths.
- The Styles panel maintains a library of effects or textures that can be applied to layers or shapes.
- The Swatches panel contains a number of pre-selected colours to choose from.
Panel Basics Keyboard Shortcuts:
- Undo: Ctrl-Z (Cmd-Z)
- Show/hide all open panels, the Toolbox and Tool Options bar: Tab
6- Toolbox : The Toolbox (or Tools panel) contains a wide range of tools used to create and manipulate images. Photoshop provides an integrated set of tools with which you can produce sophisticated graphics for print, web, and
mobile viewing . Some tools are arranged in groups, with only one tool shown for each group and the
other tools in the group hidden behind that tool. A small triangle in the lower right corner of a tool icon is your clue to
look for hidden tools. Select a hidden tool by clicking and holding down the small triangle
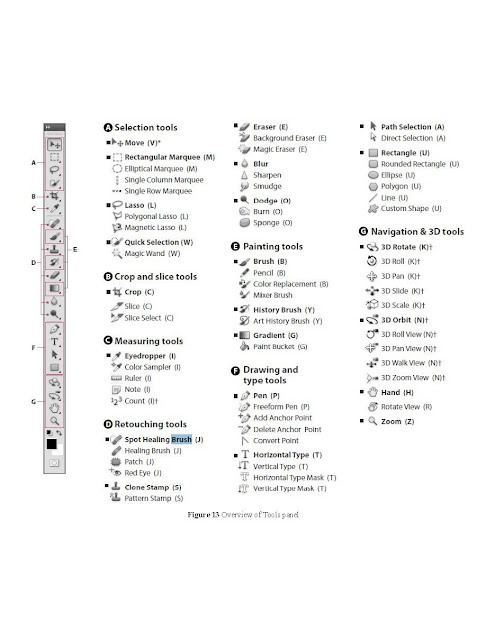
The toolbox in Photoshop is split up into 4 unique categories so that finding the right tool is never a hassle. Those categories are:
- Selection, Crop & Slice Tools
- Retouch & Paint Tools
- Drawing & Type Tools (Vector Tools)
- Annotations & Measurement Tools
In addition to these 4 sections a few other components make up the toolbox, most notably, the Foreground andBackground colors.
Selection Tools
The Marquee Tools are used for selecting objects such as rectangles, squares, and ellipses.
The Move Tool is used to move selections, objects, and layers.
There are several Lasso Tools which are used to make irregular selections. There is a polygonal lasso tool for polygon selections, and a magnetic lasso tool which automatically follows edges of objects.
The Magic Wand Tool selects an area of similar colors in a single click (such as the white in the cloud logo).
The Crop Tool allows users to redefine their active image area but not resize the ENTIRE image. It’s sort of like cutting out a smaller picture from a larger photo with a pair of scissors.
Retouch Tools
.gif)
.gif)
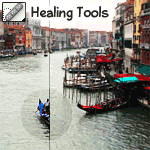
There are several healing tools in Photoshop which are used to repair imperfections in images, or handle blemishes and red-eye.
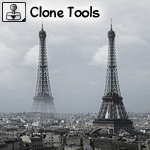
With the Clone Stamp Tool, a user may select a source starting point somewhere on an image, and then paint elsewhere using that starting point as a reference, effectively cloning the source.
.gif)
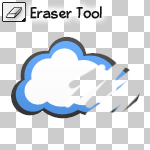.gif) The Eraser Tool can be used to erase parts of an image, selection, or layer.The Sharpen Tool is used to sharpen edges in an image, while the Blur Tool burs edges. The Smudge Tool smudges an image, similar to using fingerpaint.The Dodge Tool lightens parts of an image while the Burn Tool darkens. The Sponge Tool is used to saturate, or desaturate parts of an image.
The Eraser Tool can be used to erase parts of an image, selection, or layer.The Sharpen Tool is used to sharpen edges in an image, while the Blur Tool burs edges. The Smudge Tool smudges an image, similar to using fingerpaint.The Dodge Tool lightens parts of an image while the Burn Tool darkens. The Sponge Tool is used to saturate, or desaturate parts of an image.
Painting Tools
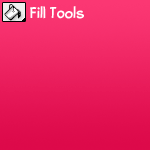 The Brush and Pencil tools are used to paint strokes in graphics. These tools can be highly customized for very effective painting.The Fill Tools are used to fill entire layers, selections and areas with a solid color, or gradient.
Vector Drawing & Type Tools
The Type Tools are used for creating and setting type in an image. Both vertical and horizontal type can be created. The Pen Tools are used to create clear shapes and paths which can be used as vector objects that can be scaled to any size. Cutom Shapes are vector objects that can be created on the fly from a list of presets (including user created shapes).
Foreground / Background Color
A foreground color and background color can be set to be used to paint with, color text, and fill objects among other things. This view provides an easy way to see what colors are currently selected, and allows for easy switching between two different colors.
Select a tool by clicking on its button or by pressing its shortcut key on the keyboard. Some tools have a small black triangle in the bottom right corner of the button. Click and hold on a tool button displaying a triangle to see other variations of the tool that appear in a fly-out menu. To do this using the keyboard, hold down the Shiftkey while repeating the tool's shortcut letter to cycle through the tool variations. In the example shown here, the Brush tool is currently selected and the user's cursor is hovering over the Pencil tool so that's why it's highlighted in yellow.

Each tool has a set of properties or options that you can modify. These properties are contained in theTool Options bar. For example, when you select the Brush tool, the Tool Options will change to display all the settings available for the Brush. You can set the brush size, the hardness or softness of the brush and various settings that determine how it operates. An example of the Tool Options bar for the Eyedropper tool is shown below.
The Toolbox Keyboard Shortcuts:
- Move tool: V
- Marquee tool: M
- Lasso tool: L
- Quick Selection tool: W
- Crop tool: C
- Eyedropper tool: I
- Healing Brush tool: J
- Brush tool: B
- Clone Stamp tool: S
- History Brush tool: Y
- Eraser tool: E
- Gradient tool: G
- Blur tool: (no shortcut key)
- Dodge tool: O
- Pen tool: P
- Type tool: T
- Path Component Selection tool: A
- Shape tool: U
- Hand tool: H
- Zoom tool: Z
- Toggle Colours: X
- Set Default Colours: D
- Cycle through tool variations: Shift-


.gif)
.gif)
.gif) The Eraser Tool can be used to erase parts of an image, selection, or layer.The Sharpen Tool is used to sharpen edges in an image, while the Blur Tool burs edges. The Smudge Tool smudges an image, similar to using fingerpaint.The Dodge Tool lightens parts of an image while the Burn Tool darkens. The Sponge Tool is used to saturate, or desaturate parts of an image.
The Eraser Tool can be used to erase parts of an image, selection, or layer.The Sharpen Tool is used to sharpen edges in an image, while the Blur Tool burs edges. The Smudge Tool smudges an image, similar to using fingerpaint.The Dodge Tool lightens parts of an image while the Burn Tool darkens. The Sponge Tool is used to saturate, or desaturate parts of an image.
.gif)


